Monday, January 1, 2024

Organized Chaos

 Happy New Year from The Organized Miniaturist

Today I want to share a way that I deal with what I think of as a micro chaos. It's a pocket of my miniature life that is not organized. Or at least it seems that way.

When I finish a project, I frequently have bits and pieces that my frugal upbringing won't allow me to throw away. The items I believe will come in handy if I want to kit bash (modify) or add to a kit I am working on or when I am DIYing a project.

If I was super organized the bits and pieces would immediately go in the proper place or one would be made for them. Instead I have a box I put them in for sorting later.

I find it is a lot easier to sort (more pleasing activity to me) when there is more of something rather a bunch of one of's. One of's need to be put away right away, where a group of groups is more efficient putting away.

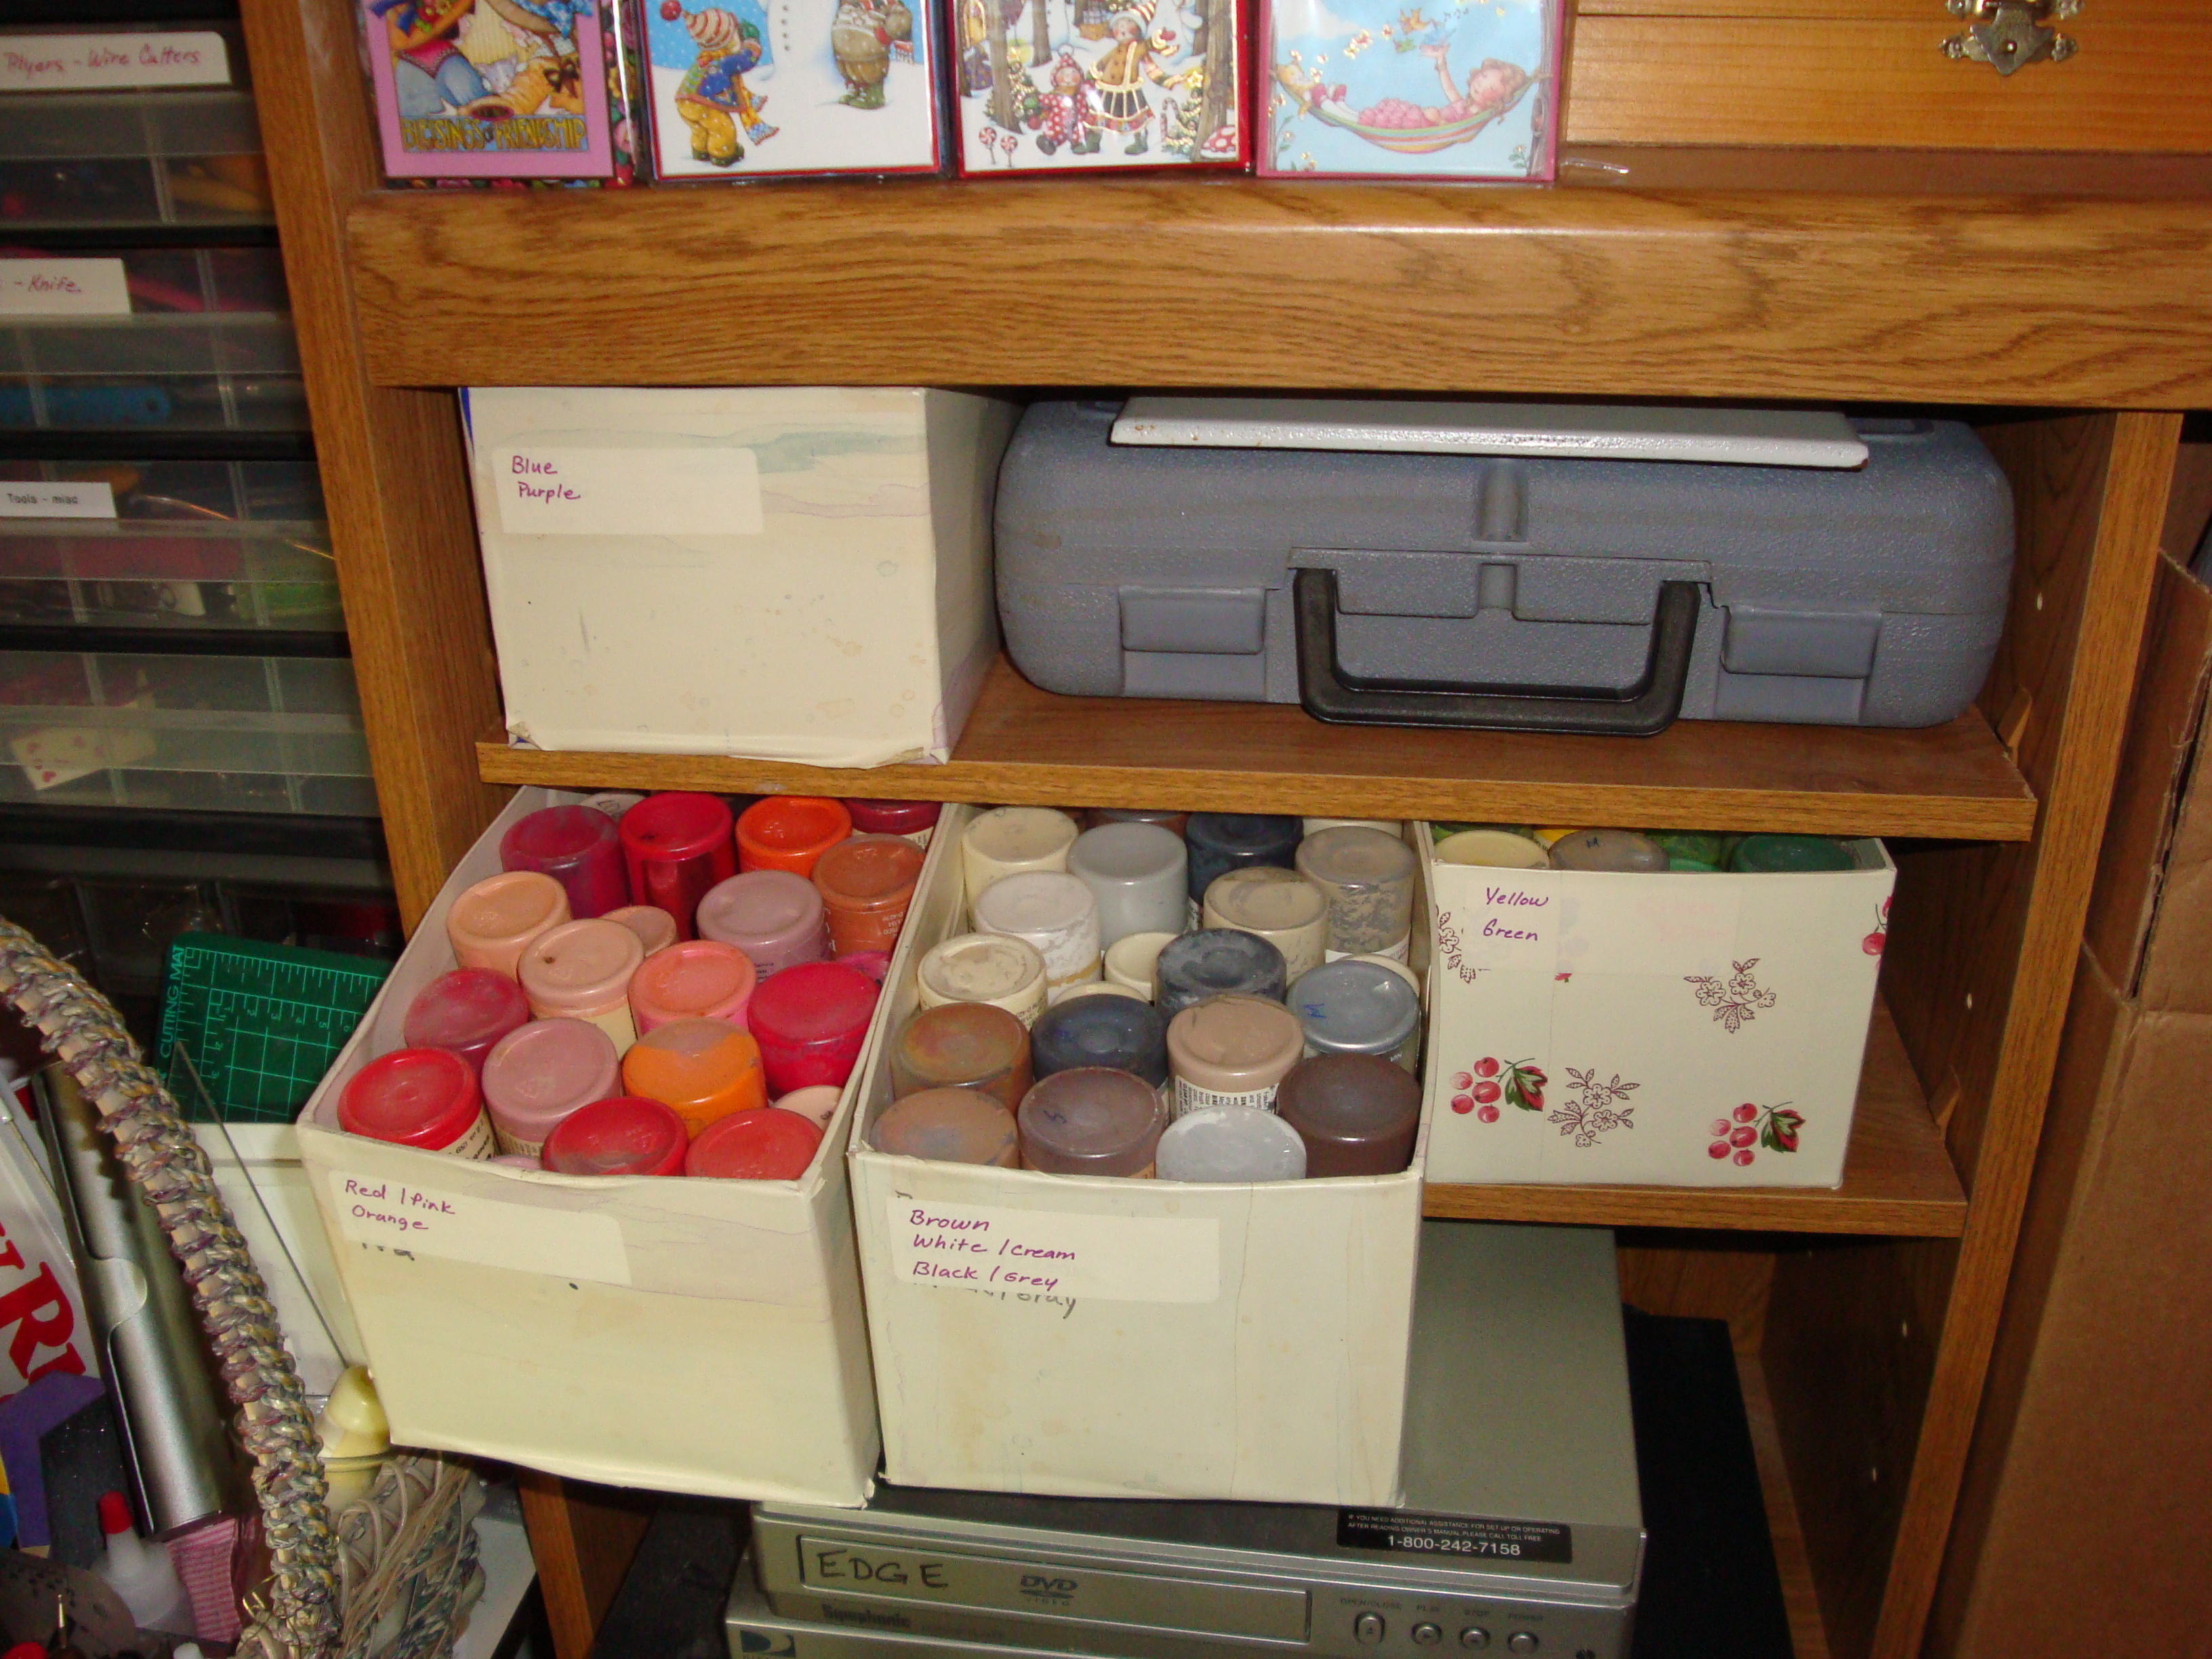
On the left is this box of bits and pieces. In the upper left is a bag where I have sorted together but alas is still in this box. Lower left shows what some of those bags consist of. 

Those bags are a mix of leftover by kit or sorted together.

Why are they sorted but not yet added to their proper storage location with other like items? When it comes to organizing it takes a while and likely I had used up my organizing energy to just get them in bags together. Putting them in proper storage location is for another day. 

When I say start small, I really mean it. Eating an elephant takes one bite at a time. Organizing minis (or anything for that matter) takes time and small chunks of time are perfectly fine.

Interesting to me was that today I found some scrap wires I had been looking for. They were in this box and I had looked before but not in this larger bag. I found them when I took the pictures above. LOL

I have done this with kits. I was purchasing several together and put them in a box together instead of in their proper place. Later I sorted them out to their proper location. Even I have put away in a place where I can't recall where. That one kit I can't find. It will turn up I know. 

What is my solution to these pockets of micro chaos? Contain them as shown above in photo boxes or a shoebox. Then when I get the organizing bug, I sort them into either their proper place or at least into groups so they can be sorted into proper place at a later time.

What do I do if I can't find what I am looking for? I compromise and look for alternative, move to a different aspect of a project, move to a totally different project, or purchase another. The latter happens rarely as I know that when I do it, whatever will turn up. I don't give up on making minis as there is always another project at my house. That's both positive and negative as I have plenty of projects but so many yet to do.

Making minis should be fun. It's a time to play. If having a bit of chaos here and there helps me to make more minis, I am all for it. But by containing them, they are organized in a way that I could still potentially find what I am looking for. Maybe not every time, but more often than not.

Happy miniaturing

Preble

The Organized Miniaturist

Find me on Instagram TheOrganizedMiniaturist

Friday, November 18, 2022

Paint Storage Again

I have been using a metal shelf in our dining room as storage for miniature supplies since my studio is currently a bedroom. On this metal shelf I added wire racks that stack together. On those I have my paint stored. My latest paint storage solution is simple and cheap. 

Prior solutions 

Initially I was using recycled priority boxes to hold my paint bottles in a prior location. The height was cut just below the bottle height. These bottles were in my studio like this. 

Recycled priority box used to hold paint bottles 

I moved those all to my bedroom on a shelf setup the same way. These are shelves on tracks that hang from a wall. However I was getting too many bottles on my desk because I didn't want to put them away. That is why I moved them from the bedroom to the dining room where I currently play. 

I switched back to bigger boxes. These were contact paper covered detergent boxes. They were cut to the height of the bottles. I've had these for years and didn't toss when I used the priority boxes. This picture shows using them before. 

Recycled detergent boxes as 'drawers' 

Then I thought about some cigar boxes a family friend had been giving me. These are bigger than the detergent boxes. I cut off the lids. Compared to the detergent size of box, these are even heavier. Also they weren't any deeper so still limited to how many fit. But more fit because they fit nested. The priority boxes is maximum of 6 bottles. For the space, I only get a few more bottles of all the same size. However not all my bottles are. 

I had 3 cigar boxes across each shelf turned length front to back. 

Issues with bigger boxes

I didn't like reaching for a box especially the top shelf when sitting. I had to get up. Ok, I probably need to get up more but that's not the point. Again I would delay putting back. 

Solution 

Inspired by the paint racks with holes, which allow to lay bottles on their side, I decided to try mine on the side but still in the cigar boxes. It worked. I had to place them so the length is left to right,which meant one less box per shelf. Also I had to choose if any paint needs be round binned (trashed). 

True colors 

I had started previously adding smears of the actual paint to the bottle tops. This helped figure out which could be trashed. I finished that. For some I had to go back and make them bigger as their smaller smear was more obvious now. Then I added, using fine point permanent marker, the color name. I don't care about names most of the time but I found this helpful.

Here is the result. 

Paint on display 

I had to do two things. First the shelves are deeper than the cigar boxes. I added those leftover priority boxes behind. I'm even using those for storage of duplicate colors. Not a total waste of space, but using what you have sometimes means sacrifice. 


Spacer boxes are storage for duplicates 

The second thing I did was add a scrap piece of wood to tilt the boxes upwards a bit. The paint bottles were sliding out and this solved it. 

Scrap wood for tilting 

On my particular shelves I have some room beside the cigar boxes and the detergent boxes for quite well. 

Extra space for odds and ends paints and glue s

I still am working on these so haven't added any labels. They are too deep to turn up. What I have in them is extra media like stain pens, glues and glitter. Temporary bottles that I don't use often but have recently. Well the glue stays there regardless.

How is using the bottles? 

There are times when another falls when I pull on one. I also don't get them back in the same spot. If I really want I can get them back with shifting whatever has rolled into the spot. I'm trying to be flexible about the colors mixing. The one purple above the browns seems out of place. But it is in the brown and purple box.

For the cost of this solution $0, I will be happy to live with these issues.

Loving it

Since I love color, I love this. It is my background when I zoom with other miniaturists.

Happy miniaturing

Preble

The Organized Miniaturist

Find me on Instagram TheOrganizedMiniaturist

Sunday, June 12, 2022

Organizing Markers

 I recently purchased several sets of Alcohol markers from Amazon. They are Ohuhu brand.

I purchased 3 different sets but ultimately kept only 2. I gave one set to my daughter.

To organize these according to the swatch cards, in the bags they came in, I used cardboard dividers. Unfortunately this brand, this style, didn't come in boxes. 


This was okay although the the markers moved when one was pulled out so this bothered me.

I decided I wanted to purchase boxes for them. But I also wanted the set of pastels (my 3rd set). I bought them first then the box later.

When the box arrived is when my organizing genes kicked in. I want them to be in order together.

Ultimately I purchased 2 boxes.


Read about how I organized the markers by color and the boxes I purchased on my website. http://mini-smallpackages.com/alcohol-markers-2-0/


Tuesday, April 13, 2021

Still temporary - but new location

I previously shared that I was playing with miniatures again in my (master) bedroom. This is due to my son moving back home to save money and pay on his student loans. He is doing that wonderfully.

I was fine in the bedroom using a tv tray to work on. However when my husband decided to join my fun, I upgraded. I lured him in with a western theme.

It was an easy transition since I was already mobile with the drawer cart. Moving to the dining room table did help with issues with the cat. She does unfortunately still get on the table, but not like she does in the bedroom. 
When Gene (my husband) started playing with miniatures with me, I kept tools on the table for us to share. We were using mugs and that was fine. But for Christmas I decided to purchase a pair of lazy-susan style organizers or spinners. I got them from Amazon but similar could be found elsewhere.

The biggest reason for using this versus my small toolbox is that the toolbox is sitting further away. This is more accessible and I am more likely to put things back. It is easy to get lazy when you don't have a cat pushing things off to get your attention.

The green cup is for water. When I have water in it, it pushed down in that section. Having a smaller cup forces me to change it more often. I used a smaller cup in a mug before. The cup is too lightweight to hold up a paint brush if I leave it to sit.
Another reason I like this spinner is the short sections.

The one thing I don't like about being at the dining room table and why I didn't switch there before the studio became a bedroom again - is dining. Some days I don't have a big mess and we could eat at the table anyway, but others we all went other places or just a couple of us would eat there. 
It isn't a huge deal to me obviously since we are doing so. However when I have more family visit, we definitely have to clean off the table of miniature things. That's where is important to have places to put what is on the table. As in the table shouldn't be where to store anything. This is where a side table like a tv tray may be a solution or just have to put things away in another room.

I also finally decided after nearly two years that I prefer to have the paint back in my bedroom from the studio. Yes, I can go to the studio, but sometimes I hated to bother my son who might be sleeping or whatever. So the shelf of paint was moved back to the bedroom under my tv. It was a good thing the lower racks for the shelves were still in place or this wouldn't have been possible.
This lead me to once again try using larger boxes (other than the small priority boxes) like a photo box. I just don't like the larger boxes because the paint falls over and then it is a mess. Not a paint mess just the bottles laying over.
I did consider purchasing a rack for paint. The best solution I found was some wood ones on ebay. Ultimately I decided not to purchase anything. But I may reconsider it when I am able to have my studio back. Then I could mount them on the wall.

Monday, April 12, 2021

Video of my Organizing Solutions

I was asked recently to do a 'Lunch and Learn' for the createminiatures.org. Their theme for April was about Spring Cleaning and Organizing.

I shared my organizing solutions and answered questions via zoom meeting.

The video can be found here.

Happy miniaturing!

Preble

Wednesday, April 15, 2020

Temporary Studio Area and Staying Organized

Studio on a String
OK, not actually a string, just very small space

My son graduated from college over a year ago and has been living in my studio since. It took 6 months for him to find a job that he wanted. One that was close to my home so he could live with us was a big consideration. The reason is that he wanted to save money and pay on student loans. This he has done.
However I no longer have that separate room to leave my projects out. I still have access to nearly all my supplies and tools. My son put most all his things in storage and just has a bed in the middle of the studio room. 

Initially I just had a small amount of things and worked in my bedroom because it had a tv. I had my studio chair and a tv tray. I also used a small area on a shelf that is for the vcr and other things connected to the tv.

During the OLHP (online house party) last year, I moved to our dining room table and had project boxes and my tools taking up close to half the table. But there is no tv there, so I soon moved back to the bedroom.

It is a scaled back and I get things from the studio as I need rather than have everything around. I also put things back in the studio when I am not using them. Staying organized is the main reason to do so. Otherwise, I would take over my bedroom with too many miniature things that I can't get to.

Earlier this year, I did make a major change. Rather than storing my small toolbox (and extra boxes of tools and glue) on a second tv tray, I emptied this taller drawer cart into a smaller one.  


I reduced the height of the tall drawer cart because I wanted to be able to easily reach my toolbox while seated on this love-seat. This meant removing one large drawer.
I don't have the drawers re-labelled in this pic. I changed the labels once I had figured out would be in each drawer. It is easy to do, by using isopropyl alcohol to wipe away the marker on the plastic tape over the little sheets. Note the wheels were added back. I didn't have them on before because I was concerned about weight nor needed to move it around. I have had the plastic piece, that the wheels go into, break before. 

I now have one drawer of paint and glues

another for cutting and clamp tools (that don't go in my toolbox)
a misc tools drawer
then another for the project I am working on
I normally keep projects in photo boxes and still other kits for and parts of the Petite Chateau are. By having a project drawer, I don't need to access a box every time I am ready for the next kit for this floor.

The basement insert for the Petite Chateau just so happen to fit the new project drawer, the rest of the drawer is then for kits and the furnishings. (Even though I finished the basement, it is still in the drawer but in the back due to not having the exterior and garage ready.)
The next level I am working on is the furnishings since the other levels are all built into the house already. 
One of the big drawers is for misc items as well like cup for holding glue, a cup of stain markers, extra plastic bags, roll of extra paper towels, etc.
The bottom big drawer I have my dremel in.

Because of my cat, I cannot leave any liquid alone with her for even a few minutes. Recently she spilled a whole can of soda on the love-seat and floor. I was quite frustrated with her and with myself because I wasn't able to work while the couch was drying. I know better, but it happened. 

My new system is to take liquids with me, empty them, or make her leave the room with me. Miniatures are not safe from her either, so I must put things away every time I am done for the day. This helps me be more organized as well.

The past few weeks I have been privileged to meet with fellow miniaturists online via zoom mtgs. 
This is my 'desk' setup from last night's mtg.
The drawer cart is pulled up to the side so I can quickly access. It has been nice to turn my arrangement around to accommodate the computer. The wheels on the drawer cart are most helpful.
The computer is closed, but yes, it is elevated on an additional stand on the black table. The additional stand helps with my neck issues. I only have the black table for the computer.

When not in a zoom mtg I just use the tv tray at the love-seat and it looks pretty much like this.

Wednesday, September 20, 2017

Storing Electrical and Landscaping Update

In my last post, I shared how I was moving my supplies to the photo boxes. I had been using them for awhile for project boxes. But as I rearranged different things, I really liked using these boxes because they fit together in the shelves I have. The reason is their uniform size. 

Electrical Supplies
Previously I had stored my electrical items in two small cabinet drawers and in my last post I shared that I had moved them to a photo-box. Well, I was fine with that although I didn't have that much stuff so the photo-box was overkill. Then I ran across a small pizza box that I had received a kit in. This box was one I couldn't part with (probably because I save things I think can still be useful for organizing) so I decided the electrical items could go here.

Now in thinking about this (using a pizza box) - it doesn't fit the same as the photo-boxes, but then I have other boxes in my supplies section that don't as well (zip bag storage box and the fishing tackle boxes). Another reason I was willing to move the electrical to a smaller box is, I am not likely to outgrow this box as I don't add to that supply except when I really need something that is generally specific to a project. I did feel the need to somehow divide up the open area. I used a checkbox lid, a jewelry box lid and then two plastic containers. (More about the plastic containers below).

During this move, I also took the time to see what I have and whether I wanted to purge any of it. I did choose to purge some items including some were for 1/12th scale and not LED's. I added the scale items to my donate to NAME box and the other will just go in the regular donate box. 


Landscaping Supplies
In August, we went camping and I had my son empty the landscaping three drawer cart. I have done this in the past. See how I use these for camping here. I empty each drawer into a plastic grocery sack and then when we come back they go back in the drawers. Those bags hung around for a few weeks and then it was a question: do I bring the 3 drawer cart back in and keep using it, or do I move landscaping supplies to the photo-boxes? This was a debate I had been having for a couple of months. Since the supplies were already out of the cart, I figured it was time to use the photo boxes. 

Going through these to make them fit into the photo-boxes was a good process. 
  • I took the time to combine some smaller bags into larger bags where the product was the same. 
  • Some of these were due to have purchased at several different times the same product. Or due to it came in a kit. 
  • Also I had bags made up to sell or swap and then didn't. 
  • A couple even had product in that because the bag was printed with a picture, I couldn't really tell what was in it. So I switched this to a completely clear bag. 
  • Some items were in big bags and so those were moved to smaller bags.
  • Another thing I did was to review these for scale. I still had some items that were really for larger scale than 1:48 or smaller. Since my focus is 1:48, I felt it would be better to donate these. 
  • Also I had some dried items that were larger that I gave to my daughter for her projects. 

The result of this organizing and culling was the use of 4 photo-boxes for landscaping organized/separated/sorted by color. 

Plastic Supplies
In my last post, I shared how I sorted some plastic bits to make things with. But I also had a drawer of plastic containers. 

When I was swapping often, I needed to have something to package them in. When I get the swaps back, I receive a variety of packaging. I save most of them to have on hand to package the next time. Plus anything else that was plastic but not really small.
This has all been stored in a drawer of my tall drawer cart. 
The 4th drawer down had these plastic items in it.

In the process of the landscaping organizing, I had to get into this drawer and I decided it was time to go thru these items. I had some packaging from my last swap that needed to be stored. So I emptied the drawer and began by putting like items together. 

The results was two boxes and better visibility of the items I have. Items that were plastic but not containers, I put them were they are to be used. These were some plastic plates and their purpose was for painting palates. 
At first glance this may look like a jumble and hardly better than I had before. But this is organized like items together. It also reminded me of what items I had that could be used for organizing, not just swaps or painting palettes. Consequently I used two of the rectangle boxes in the upper left corner in the electrical box. These little boxes have locking handles (blue).  It's a bit of overkill for most of my items and they are super neat, so hadn't been able to find a place for them. But for the electrical items this was great.